Showing posts with label java. Show all posts

Thursday, January 01, 2015

Merging Garmin Heart Rate data with Activities

I was lucky enough to receive a Garmin Vivofit recently and am really happy with it so far.

It does a good job for what it's meant to do. My primary use is for Heart Rate monitoring when exercising, but I'm also interested in the step counts and goals.

I haven't used the Garmin Connect website in a while - and it's latest incarnation has quite a pleasing design.

One thing I quickly realised though is that there is still no way to combine the data from my  Garmin Edge 200, and my HR data - either from my Vivofit or Garmin FR60.


You can synchronise each activity fine, but not combine them - well, at least I couldn't see an easy way to do this. Please correct me if I'm wrong.

A little googling showed that this is quite a common problem, and naturally enough there were a number of solutions as well.


Essentially it provided a simple XSL transform to merge the two files. There was also a subsequent little java app which embedded the transform and provided a simple little GUI.

The results for me did not work however. Not sure if it was just me, or that the schema had since changed.

I was keen to get the HR data on the same display though, so spent an afternoon tinkering.

The process I used to get started was:
  1. Synchronise the clocks from the Garmin Edge 200, and that of the FR60. You need to use the Edge 200 as the source - since it is based on the GPS clock, and hence you can't change this one.
  2. Went for a ride, starting the activities at more or less the same time
  3. Synchronise each device with the Garmin Connect
  4. Retrieve each activity as a TCX file
I now had some data to work with.

The raw Cycle file looked like this:


You can easily see the straight forward capture of each tracking point.

The HR data is very similar:
Again, very straight forward. 

I took a very standard approach to tinkering ... manipulate the file - manually at first - until you get a format that's acceptable to the Garmin Connect uploader.

At first, I tried the simplest thing - of copying in all track points containing HR data - after the cycle ones. Which didn't work.

Next try was to adjust every Cycle tracepoint to include a HR data point - which was just a constant. To validate this, a simple all change via Sublime Text did the trick. I also manually added the HR summary data to the Lap header information - and ... success.

So now I knew what the format should be - and it was just a simple matter of programming to write an app to do that.

I dusted off some old familiar tools:
  • Eclipse
  • Java
  • JDOM for xml handling
The main thing I wanted do was to drive the process from the Cycle data - after all, we simply wanted to annotate each cycle track point with the most appropriate HR data point.

The high level view is to:
  • read the Cycle data
  • read the HR data
  • for each cycle track point
    • find the appropriate HR track point
      • if the HR data hadn't started yet - simply use the first one
      • or, if there is an exact match, use it
      • or, use the latest HR track point which is earlier than the cycle track point
      • or, if the HR data has ended prematurely - just use the last HR track point
    • add the HR element to the cycle element
  • extract the HR summary data and add it to the Lap header
Simple really.

The result is something like this:

The last remaining steps were to:
  • remove the Cycle activity from Garmin Connect
  • upload the newly combined activity - which has the same internal activity ID
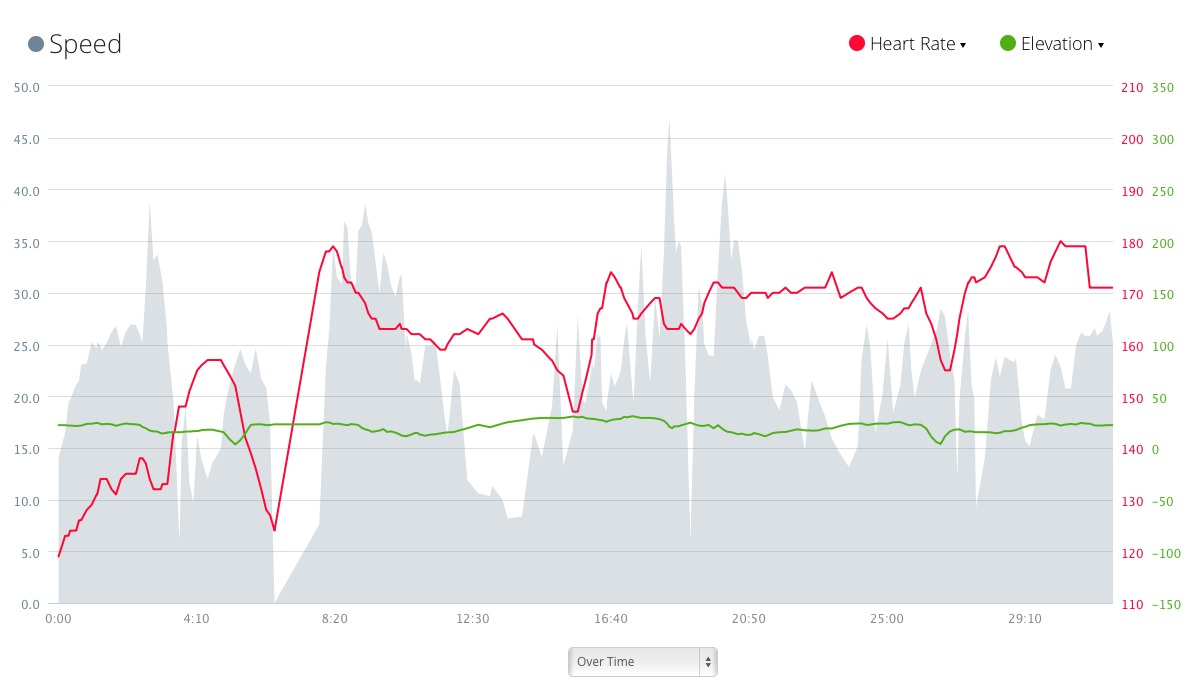
And then - Garmin Connect displays the data as I wanted to:


As an added bonus, you can click on the dual arrows to the right of each chart - to then select a larger zoomed display - and overlay the other data:
I hope to tidy up the code soon, and post it to see if others would like to use it.


Monday, February 20, 2012

Exporting Graphs from neo4j

I've recently had a brief introduction to the Neo4j database - by way of the YOW 2011 conference in Brisbane.

It looks really interesting - so I set about performing a few experiments. One of which is taking a graph and exporting it for use via other tools.

For example, here's a really simple graph - shown via neoclipse:
Sample Graph
And the code to produce it is like this:

Node nodeA = graphDb.createNode();
Node nodeB = graphDb.createNode();
Node nodeC = graphDb.createNode();
Node nodeD = graphDb.createNode();
Node nodeE = graphDb.createNode();


nodeA.setProperty("name", "A");
nodeB.setProperty("name", "B");
nodeC.setProperty("name", "C");
nodeD.setProperty("name", "D");
nodeE.setProperty("name", "E");


Relationship rel = null;
rel = nodeB.createRelationshipTo(nodeA, RelationshipTypes.DEPENDS);
rel = nodeC.createRelationshipTo(nodeA, RelationshipTypes.DEPENDS);
rel = nodeD.createRelationshipTo(nodeC, RelationshipTypes.DEPENDS);
rel = nodeE.createRelationshipTo(nodeC, RelationshipTypes.DEPENDS);

Nothing exciting to see there.

So, using the Cypher language for querying, I thought I'd investigate how to dump the graph structure so I could export it.

Assuming that A is the starting point of our Graph - just getting the nodes which are related to A can be found via this query:

start n=node:concepts(name="A") 
match (n)<-[r]-(x) return x.name, r

Results are:
+-------------------------+
| x.name | r              |
+-------------------------+
| "C"    | :DEPENDS[1] {} |
| "B"    | :DEPENDS[0] {} |
+-------------------------+
2 rows, 978 ms

But, to retrieve the whole graph, I require all nodes which have a relationship with A. So another attempt is this - allowing for multiple depth relationships:

start n=node:concepts(name="A") 
match (n)<-[r:DEPENDS*1..3]-(x) return x.name, r

Results are:
+-------------------------------------------------+
| x.name | r                                      |
+-------------------------------------------------+
| "C"    | List(Relationship[1])                  |
| "E"    | List(Relationship[1], Relationship[3]) |
| "D"    | List(Relationship[1], Relationship[2]) |
| "B"    | List(Relationship[0])                  |
+-------------------------------------------------+
4 rows, 100 ms

However, this doesn't help to recreate the graph. To do this, I need each source and destination node - and the relationship. The next attempt makes use of the fact that you can specify a minimum cardinality of zero of the relationship predicate - which allows you to include the start node as well. Using this allows us to construct a query like this:

start n=node:concepts(name="A") 
match p1=(n)<-[rel:DEPENDS*0..2]-(x)<-[r:DEPENDS]-(y) 
return n, x, r, y 

Which returns results like this:
+-------------------------------------------------------------------------------+
| n                  | x                  | r              | y                  |
+-------------------------------------------------------------------------------+
| Node[1]{name->"A"} | Node[1]{name->"A"} | :DEPENDS[1] {} | Node[3]{name->"C"} |
| Node[1]{name->"A"} | Node[1]{name->"A"} | :DEPENDS[0] {} | Node[2]{name->"B"} |
| Node[1]{name->"A"} | Node[3]{name->"C"} | :DEPENDS[3] {} | Node[5]{name->"E"} |
| Node[1]{name->"A"} | Node[3]{name->"C"} | :DEPENDS[2] {} | Node[4]{name->"D"} |
+-------------------------------------------------------------------------------+
4 rows, 31 ms

From here, it's a small matter of programming to iterate through these results, and generate an XML representation (for example, GraphML style) - like this:


<graph start="1">
  <node id="1">
    <data key="d0">A</data>
  </node>
  <node id="3">
    <data key="d0">C</data>
  </node>
  <edge id="e1" source="3" target="1">
    <data key="d1">DEPENDS</data>
  </edge>
  <node id="2">
    <data key="d0">B</data>
  </node>
  <edge id="e0" source="2" target="1">
    <data key="d1">DEPENDS</data>
  </edge>
  <node id="5">
    <data key="d0">E</data>
  </node>
  <edge id="e3" source="5" target="3">
    <data key="d1">DEPENDS</data>
  </edge>
  <node id="4">
    <data key="d0">D</data>
  </node>
  <edge id="e2" source="4" target="3">
    <data key="d1">DEPENDS</data>
  </edge>
</graph>


The first column of the result - N - is simple used to infer the start node. In this case, it's "A" - as specified by the query.

Tuesday, January 29, 2008

Photoshop Elements - Explorer Part 2

Due to overwhelming demand (well, at least 1 person :-)), I've put up my initial code for exploring the Photoshop Elements database. For a small bit of background info, see my previous post.

I thought I'd give google code a try for hosting - as such, the project is located here.

Drop me a line in the comments if you're interested in participating.

Friday, January 04, 2008

Cheat Sheet Extensibility - Part 2

Oops.

I forgot to mention one of the little tricks required to make the cheat sheet actually usable - you need to be able to signal it's completion :-)

There are a few things required to make this happen:
  1. the task requires a UI control which allows the user to signal that the task is complete. I used a form hyperlink control, similar to the following:
    ImageHyperlink link = toolkit.createImageHyperlink(
    form.getBody(),
    SWT.WRAP);
    Image img = AbstractUIPlugin.imageDescriptorFromPlugin(
    Activator.PLUGIN_ID, "/icons/complete_task.gif").createImage();
    link.setImage(img);
    link.addHyperlinkListener(this);
  2. a reference to the task being edited must be obtained. Fortunately, this is made available when the setInput method is called. In this method, use some code like this:

    public void setInput(IEditableTask _task, IMemento memento) {
    task = _task;
    }
  3. attach a listener to the control


  4. when the link is activated, your listener will be fired. When this happens, the task should be set to complete. This is then just a simple method call using the task instance which has already been saved:

    task.complete();

Wednesday, January 02, 2008

Cheat Sheet Extensibility

I've been looking at the Eclipse Cheat Sheet capability recently - with a view to using it more as a workflow assistance tool, rather than a "follow these instructions" helper.
As such, the idea of crafting specific tasks that the user can interact with seems an appealing idea.
Here's a screen shot of a simple first attempt.


Note that I've used the Eclipse Forms controls to blend in with the "flat look" layout.
This was pretty easy to get going:
  1. Define a task extension in your plug-in.
    <taskEditor
    class="mypdeproject.tasks.MyTaskExtension"
    icon="icons/sample.gif"
    id="MyPdeProject.taskEditor1">
    </taskEditor>

  2. Define the class referenced above. It needs to implement org.eclipse.ui.internal.provisional.cheatsheets.TaskEditor
  3. Implement the required methods. The main one of which is the createControl method - to create the UI controls used to edit the task.
    public void createControl(Composite comp, 
    FormToolkit toolkit) {

    form = toolkit.createForm(comp);
    form.setText("Hello, Eclipse Forms");

    }
    Obviously, you may want to define a few more fields in there than this.
  4. Define a complex task, and then reference our newly defined task extension.
    <task id="t2" kind="MyPdeProject.taskEditor1" 
    name="Extended task"
    skip="false">
    <intro>
    Introduction Extended
    </intro>
    <onCompletion>
    This is the Conclusion
    </onCompletion>
    </task>

And that's it! Simple really.
Next, I'll take a look at how you can use task variables to communicate between your tasks.

Wednesday, December 05, 2007

Getting started with XProc using Eclipse

This post looks at how to get started with Norm Walsh's XProc implementation - using Eclipse.

XProc is an XML Pipeline Language, which is being defined by the folks at the XML Processing Model Working Group. Norm has an experimental implementation, hosted at https://xproc.dev.java.net/. The release notes are here.

Naturally enough, this is as a Netbeans project - but I thought I'd give it a try using Eclipse. It was pretty easy in the end:
  1. Start your favourite Eclipse version - I used 3.3
  2. Add in a Subversion plugin (since dev.java.net uses subversion). I've been using Subclipse lately. See http://subclipse.tigris.org/ for more details.
  3. Point your SVN explorer to the repository https://xproc.dev.java.net/svn/xproc
  4. Check out as a new Java Project using the Wizard.
  5. Download (some of) the required frameworks ... I found that I could get by with Saxon 6.5 and Saxon 9 to get started. Add these .jars to the build path. Also note that you should add saxon9-s9api.jar as well as saxon9.jar.
  6. Adjust the build path - so that these two directories are used as the java source:

    java/src
    java

    The second is required, since a number of configuration files are referenced using a path like /etc/configuration.xml and as such, they need to be findable on the classpath. Eclipse will make sure that you exclude java/src from this include. Your classpath should look something like this:


  7. I used the xproc.Driver class to do a simple test. It was not long before I realized that things were not happy due to my running on a Windows box. I needed to change this line:

    hash.put(port, "file://" + fn);

    to this:

    hash.put(port, "file://" + "/" + fn);

  8. I then needed to use this sort of command line arguments:

    -i source=c:\fred.xml java/samples/count.xpl

  9. This just runs the count pipeline against a simple xml document.
Simple.

Here's a screenshot of the project contents:


Note that some errors are shown (since not all required libraries are provided), and that all three of the saxon libs are required.

And for good measure, here's a screen shot of a successful run:

Monday, October 15, 2007

Eclipse Commands

The new command framework for Eclipse looks quite good. But I found it a little hard to get started with it.

I've found some really useful info here though:
One problem I've encountered though, is how to determine the command Id for an existing workbench function. In this case, I wanted the "Help -> About" function to be present in my RCP app.

I stumbled across a simple solution - cheat! That is, use the Cheat Sheets wizard to give a helping hand. (Thanks to Chris Aniszczyk for his informative article on Cheat Sheets - reading it gave me the inspiration for this!)
  1. Create a new cheat sheet, by selecting File -> New ... and then selecting "Cheat Sheet".
  2. Just use any name, and specify a "Simple" cheat sheet.
  3. Once in the editor, select the "Item" - and on the right hand side of the form, you will be able to specify a command - using the gift of Browse.
  4. Click on the Browse button, and you'll be presented with a list of common workbench commands. For example:
  5. You can then select the Command, and even press "Execute" to try it.
I've found this a handy trick.

Friday, October 12, 2007

Photoshop Elements

Well, I finally took the plunge - and upgraded my Photoshop Elements 3.0 (and Photoshop Album) to the new Photoshop Elements 6.0 (PSE6).

A few things caused the change:
  • the old version was starting to creak a little bit
  • lots of annoying little bits -like no alternative date format
  • the ability to use star ratings
  • the shiny new interface looked cool!
The upgrade went really well. As other people have noticed - you need to then manually go and convert your old catalogs using the "Catalog Manager" (File -> Catalogs ...).

One disappointment is that there (still) does not seem to be an adequate interface to Flickr. What is with the whole Adobe Partner Services thing? As such, in the past I've whipped up some Java to scan my PSE catalog (stored in an Access/Jet style) database, and reconcile that against my Flickr account - using the flickrj project as the framework.

One pleasant surprise is that the framework used to store the database has been updated. It now uses something called SQLite. This looks really interesting, as it is a well featured SQL database, which stores it's entire contents in a single file. (Apparently, Lightroom also uses SQLite, but I think a different schema.)

Naturally, I needed to check out the schema. Two ways spring to mind:
  1. Native access - via the SQLite facilities
  2. JDBC access.
A few little notes on each follow below.

Native SQLite Access
  1. download the executable from here. This gives you a zip. Simply extract the contents - a single .exe to a location of your choice.
  2. locate your PSE catalog location - an easy way is to use the Help -> System Info ... menu option.
  3. use the command sqlite3 filename
This gives you a simple command line interface. The commands are all "." prefixed - for example, use ".help" to get started.

JDBC

There is a JDBC interface available. I decided to try the one available here. It was a simple matter of:
  1. create an Eclipse project (or IDE of choice)
  2. add the jar file to the class path
  3. use the sample code to start exploring
It does seem very straightforward. I'll post some code, etc after a bit more digging.

Tuesday, May 09, 2006

Serving it up

Isn't it about time that we got the mainframe to actually serve up something useful - you know, in a server kind of way.

Working in a support role, a common task involves checking the output of previous jobs via ISPF - and, more specifically SDSF. Well naturally, there's always a better way.

For a while now (must check when), z/OS has provided an FTP interface to the JES facilities. This allows for all sorts of goodness:

  • being able to list jobs
  • retrieving all output datasets for a job
  • submitting jobs.
... all from the comfort of your FTP client!

What's that? You'd rather use SDSF than an FTP command line to inspect output. Of course you would. But what if you could craft a custom Java interface! Now we're talking. Say tuned for more details.