I was lucky enough to receive a Garmin Vivofit recently and am really happy with it so far.
It does a good job for what it's meant to do. My primary use is for Heart Rate monitoring when exercising, but I'm also interested in the step counts and goals.
I haven't used the Garmin Connect website in a while - and it's latest incarnation has quite a pleasing design.
One thing I quickly realised though is that there is still no way to combine the data from my Garmin Edge 200, and my HR data - either from my Vivofit or Garmin FR60.
You can synchronise each activity fine, but not combine them - well, at least I couldn't see an easy way to do this. Please correct me if I'm wrong.
A little googling showed that this is quite a common problem, and naturally enough there were a number of solutions as well.
Essentially it provided a simple XSL transform to merge the two files. There was also a subsequent little java app which embedded the transform and provided a simple little GUI.
The results for me did not work however. Not sure if it was just me, or that the schema had since changed.
I was keen to get the HR data on the same display though, so spent an afternoon tinkering.
The process I used to get started was:
- Synchronise the clocks from the Garmin Edge 200, and that of the FR60. You need to use the Edge 200 as the source - since it is based on the GPS clock, and hence you can't change this one.
- Went for a ride, starting the activities at more or less the same time
- Synchronise each device with the Garmin Connect
- Retrieve each activity as a TCX file
I now had some data to work with.
The raw Cycle file looked like this:
You can easily see the straight forward capture of each tracking point.
The HR data is very similar:
Again, very straight forward.
I took a very standard approach to tinkering ... manipulate the file - manually at first - until you get a format that's acceptable to the Garmin Connect uploader.
At first, I tried the simplest thing - of copying in all track points containing HR data - after the cycle ones. Which didn't work.
Next try was to adjust every Cycle tracepoint to include a HR data point - which was just a constant. To validate this, a simple all change via Sublime Text did the trick. I also manually added the HR summary data to the Lap header information - and ... success.
So now I knew what the format should be - and it was just a simple matter of programming to write an app to do that.
I dusted off some old familiar tools:
- Eclipse
- Java
- JDOM for xml handling
The main thing I wanted do was to drive the process from the Cycle data - after all, we simply wanted to annotate each cycle track point with the most appropriate HR data point.
The high level view is to:
- read the Cycle data
- read the HR data
- for each cycle track point
- find the appropriate HR track point
- if the HR data hadn't started yet - simply use the first one
- or, if there is an exact match, use it
- or, use the latest HR track point which is earlier than the cycle track point
- or, if the HR data has ended prematurely - just use the last HR track point
- add the HR element to the cycle element
- extract the HR summary data and add it to the Lap header
Simple really.
The result is something like this:
The last remaining steps were to:
- remove the Cycle activity from Garmin Connect
- upload the newly combined activity - which has the same internal activity ID
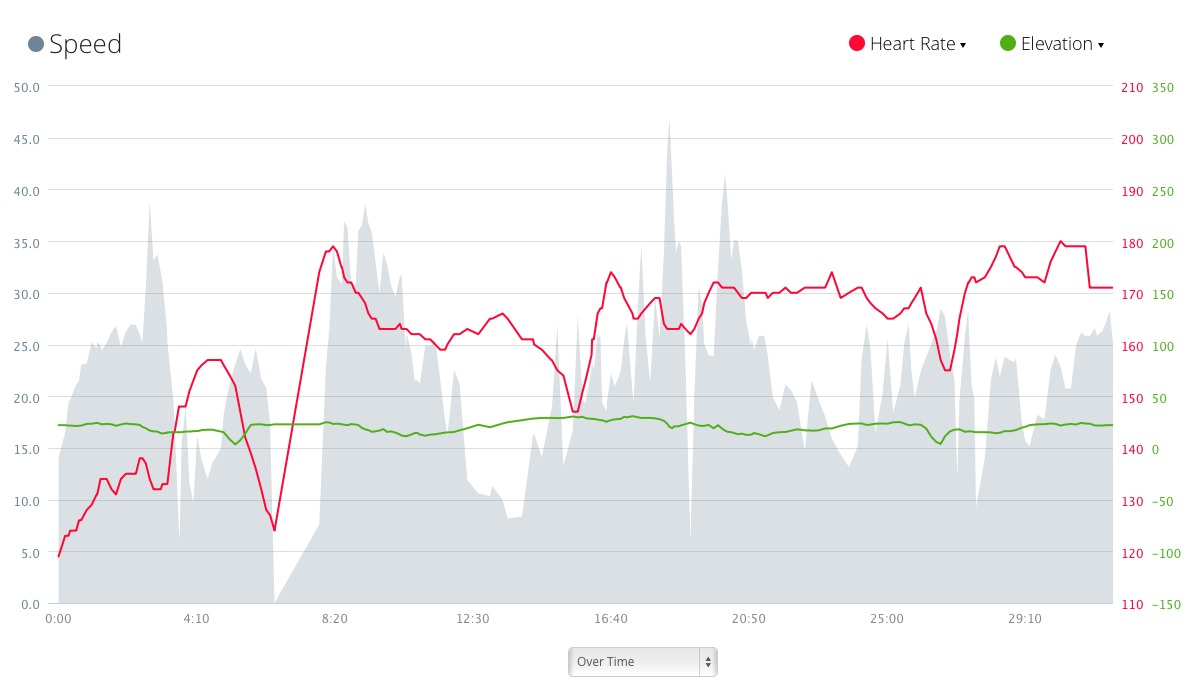
And then - Garmin Connect displays the data as I wanted to:
As an added bonus, you can click on the dual arrows to the right of each chart - to then select a larger zoomed display - and overlay the other data:
I hope to tidy up the code soon, and post it to see if others would like to use it.